

 12.4 Updating File and
Print Server
We are now ready to restore the files previously saved
with LSMT. The first step is to reinstall the LAN Server Managment Tools (LSMT)
on the server. This has to be done as described in
12.1 Using LSMT to Save the Domain
Definitions.
The next step is to restore the \LSMT\DOMAINNAME directory with all its
subdirectories, containing the domain and server definitions used from LSMT.
Normally you will NOT need to restore the system related configuration files
as CONFIG.SYS, HPFS386.INI, IBMLAN.INI, LANTRAN.LOG or PROTOCOL.INI. However,
you will need to restore the domain definitions.
To restore the domain definitions you must select all
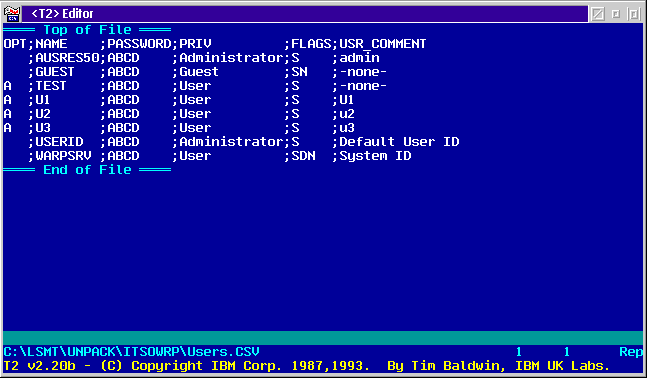
the *.CSV files and drag and drop them into the <T2> EDITOR.
You must type in the OPT column an:
-
A
- to ADD the users, groups, ACL's, assignment, aliases and applications to
the domain.
-
D
- to DELETE users, groups, ACL's, assignment, aliases and applications to the
domain.
-
U
- to UPDATE users, groups, ACL's, assignment, aliases and applications to the
domain.

Figure 88: <T2> Editor
For the restore, you should proceed in the following order:
- Define all servers.
- Select the SERVERS.CSV and drag and drop it on the <T2>
Editor object.
- In the OPT column you must type in A, for Add.
- Save and Exit.
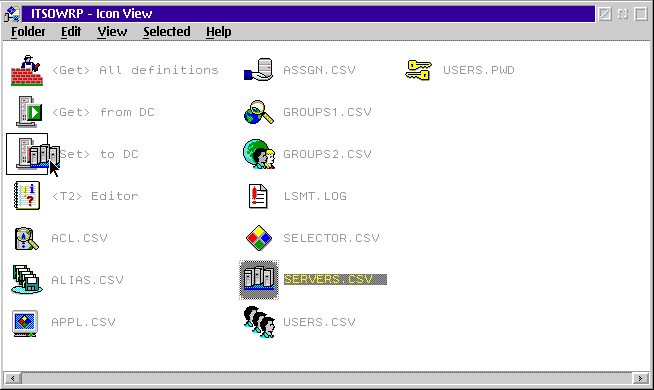
- Drag and drop the SERVERS.CSV icon to the <SET> to
DC icon as shown in Figure 89.
- Type in the computer name of the Domain Controler in the Specify
Parameters window that appears.
- Click on Open.
- A processing window appears. Press Enter when done.

Figure 89: ITSOWRP Icon View
- Define all users (with initial passwords).
- Select the USERS.CSV and drag and drop it on the <T2>
Editor icon.
- In the OPT column you must type in A, for Add.
- Save and Exit.
- Drag and drop the USERS.CSV icon to the <SET> to
DC object.
- Type in the computer name of the Domain Controler in the Specify
Parameters window that appears.
- A processing window appears. Press Enter when done.
- Change initial passwords to the original passwords.
- Select the USERS.PWD icon and drag and drop it to the
<SET> to DC icon.
- When you are prompted with a Specify Parameters window, type in the
computer name of the Domain Controller.
- Click on Open.
- You get a processing window processing all the passwords.
- Press Enter when done.
- Define all groups.
- Select the GROUPS1.CSV icon and drag and drop it <T2>
Editor icon.
- In the OPT column you must type in A, for Add.
- Save and Exit.
- Drag and drop the GROUPS1.CSV icon to the <SET> to
DC icon.
- When you are prompted with a Specify Parameters window, type in the
computer name of the Domain Controller.
- Click on Open.
- The processing window appears.
- Press Enter when done.
- Assign users to groups.
- Select the GROUPS2.CSV icon and drag and drop it on the
<T2> Editor icon.
- In the OPT column you must type in A, for Add.
- Save and Exit.
- Drag and drop the GROUPS2.CSV icon to the <SET> to
DC icon.
- When you are prompted with a Specify Parameters window, type in the
computer name of the Domain Controller.
- Click on Open.
- The processing window appears.
- Press Enter when done.
- Define aliases.
- Select the ALIAS.CSV icon and drag and drop it on <T2>
Editor icon.
- In the OPT column you must type in A, for Add.
- Save and Exit.
- Drag and drop the ALIAS.CSV icon to the <SET> to
DC icon.
- When you are prompted with a Specify Parameters window, type in the
computer name of the Domain Controller.
- Click on Open.
- You will get a warning screen reminding you to apply the access
permissons to the subdirectories contained in the aliases.
- Press Enter when done.
- Define applications.
- Select the APPL.CSV icon and drag and drop it on the <T2>
Editor icon.
- In the OPT column you must type in A, for Add.
- Save and Exit.
- Drag and drop the APPL.CSV icon to the <SET> to DC
icon.
- When you are prompted with a Specify Parameters window, type in the
computer name of the Domain Controller.
- Click on Open.
- You get a processing window.
- Press Enter when done.
- Define applications selector.
- Select the SELECTOR.CSV icon and drag and drop it on the
<T2> Editor icon.
- In the OPT column you must type in A, for Add.
- Save and Exit.
- Drag and drop the SELECTOR.CSV icon to the <SET> to
DC icon.
- When you are prompted with a Specify Parameters window, type in the
computer name of the Domain Controller.
- Click on Open.
- You will get a processing window.
- Press Enter when done.
- Define ACL's for all aliases (with or without
apply).
- Select the ACL.CSV icon and drag and drop it on the <T2>
Editor icon.
- In the OPT column you must type in A, for Add.
- Save and Exit..
- Drag and drop the ACL.CSV icon to the <SET> to DC
icon.
- When you are prompted with a Specify Parameters window, type in the
computer name of the Domain Controller.
- Click on Open.
- You get a processing window.
- Press Enter when done.
- Set the logon assignments.
- Select the ASSGN.CSV icon and drag and drop it on the <T2>
Editor icon.
- In the OPT column you must type in A, for Add.
- Save and exit.
- Drag and drop the ASSGN.CSV icon to the <SET> to DC
icon.
- When you are prompted with a Specify Parameters window, type in the
computer name of the Domain Controller.
- Click on Open.
- You will have a processing window.
- Press Enter when done.
To check that the restore procedure has worked, go to the IBMLAN
Services icon, open the LAN Server Administration icon and check
your domain definitions.


 12.6 Updating
TCP/IP


 12.4 Updating File and
Print Server


 12.4 Updating File and
Print Server
